Table of Contents
Introduction
Photoshop is a powerful tool for graphic designers, photographers, and creatives alike.While many are familiar with its basic functions, mastering variables can take your skills to the next level. Variables allow you to automate repetitive tasks, create multiple versions of a design with ease, and simplify your job process.We will discuss How to Automate 100s of Customized Designs using “Variables” in Photoshop and how to use it to improve your artistic endeavours in this tutorial.
Understanding Variables
Variables in Photoshop are placeholders that can be used to automatically populate different elements of your design. These elements can include text, images, shapes, and even layer styles. You may quickly produce several variations of a design without manually editing each individual element by defining variables and their corresponding datasets.
Streamline design Creation with Variable Names Using Photoshop: A Step-by-Step Guide
Step 1: Design Your Template
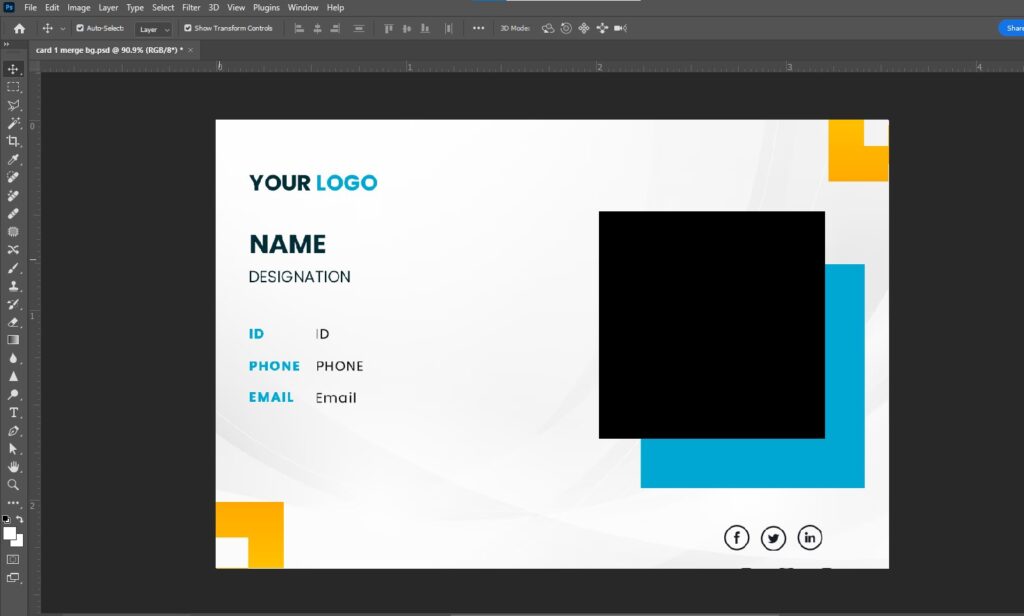
To begin, create a blank Photoshop document with your card’s dimensions and design in it. Design the card template, leaving placeholders for the variable content such as the name, Designation, ID, Phone, email and photo. Ensure that these placeholders are positioned appropriately within the design.
The images that you make in Photoshop must match the dimensions of the images that you use to replace the variable. Put them in the same folder as the Photoshop file you have.

Step 2: Make Data Source
To create a data source, follow the steps below :
Make a.CSV (Comma-Separated Values) file for the data source using Excel.
What is .CSV
CSV files, or comma-separated values, are frequently used to organise and transfer data between various programmes. Excel is a great application for producing CSV files because of its easy-to-use user interface and strong data management features.
Open Microsoft Excel
Start by opening Microsoft Excel on your PC. If you don’t have Excel installed, you can use alternative spreadsheet software that supports CSV file creation
Enter Your Data
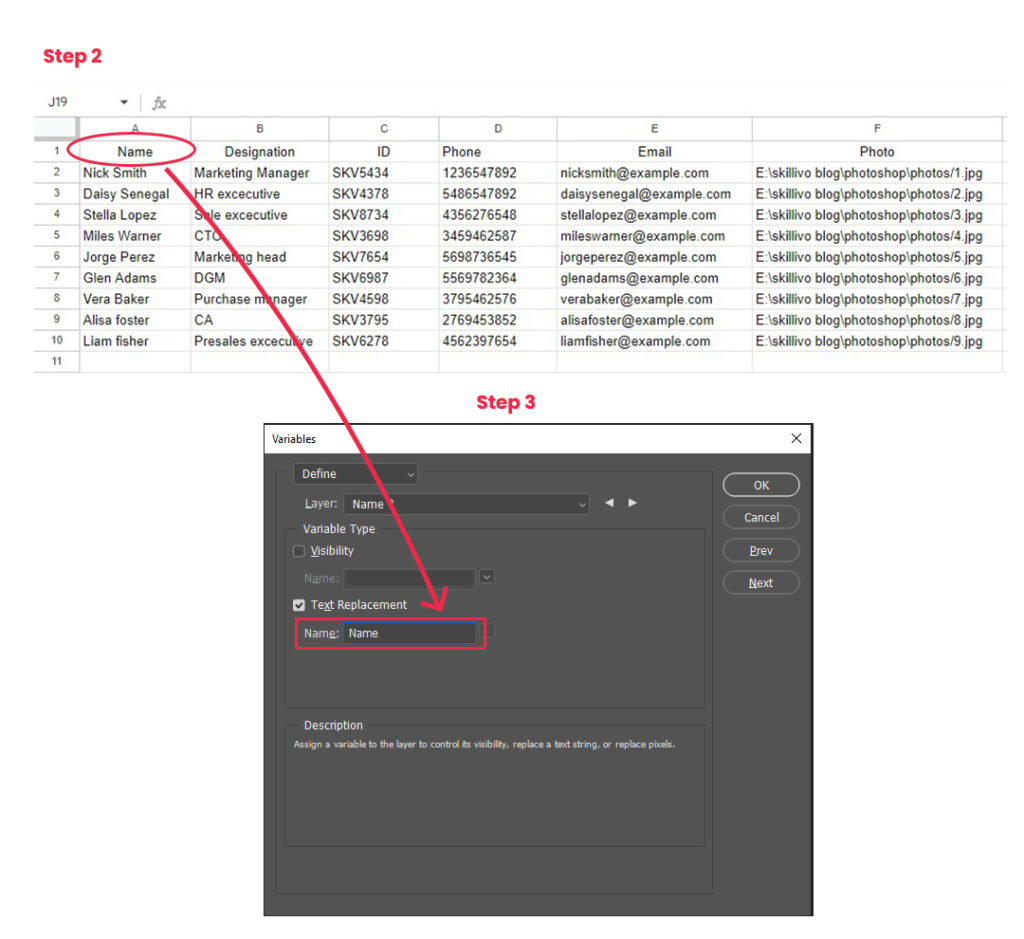
In the Excel worksheet, enter the data you want to include in your CSV file eg. Name, Designation, ID, Phone, Email and for image write correct path of that image in every cell. Be careful not to include commas while entering data.
Save As CSV Format
- Click on the “File” menu in the top-left corner of the Excel window.
- Select “Save As” from the dropdown menu.
- Choose the location where you want to save the file.
- In the “Save as type” dropdown menu, select “CSV (Comma delimited) (*.csv)”.
- Enter a name for your CSV file in the “File name” field.
- Click the “Save” button to save the file.
Step 3: Define Variables for Text and Images in photoshop
Navigate to the “Image” menu in Photoshop and select “Variables” > “Define.” In the Variables dialog box, Select layers which you want make dynamic and enable “Text Replacement” options. This allows you to replace text. For images enable “Pixel Replacement” option and select “method” to “conform”. Click “OK” to proceed.
Note: In “Text Replacement” and “Pixel Replacement” option give the variable the same “Name” as the Excel column heading.
Note: conform method resizes the image to fill the bounding box. it may not preserve the original proportions.

Step 4 : Set Up Your Data Set
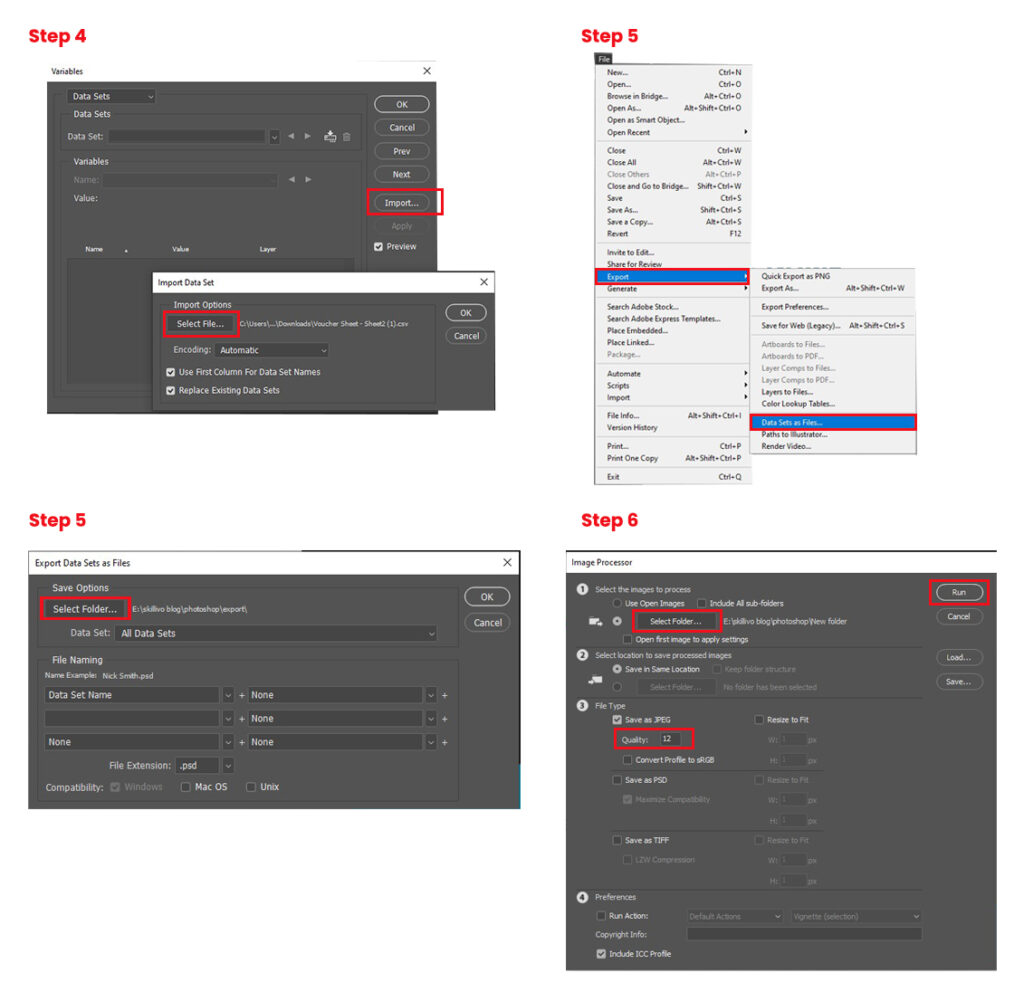
Next, go to the “Image” menu again and choose “Variables” > “Data Sets”. Click on “Import” > Select File > Select “CSV (*.CSV)” file option from bottom instead of “Text File (*.TXT)”. Then Select your .CSV file. enable “Use First Column For Data Set Names” for getting file in specific names, if you want . Click “OK” to confirm
Step 5: Export Data Sets as Files
Select “File” > “Export” > “Data Sets as Files” in Photoshop. Choose to export the files in the desired format (e.g., PSD) and specify a separate folder for the exported files. Photoshop will generate individual files for each combination of variables in your dataset.
Step 6: Convert PSD Files to JPG Format
With the PSD files exported, it’s time to convert them to JPG format for distribution. Navigate to “File” > “Scripts” > “Image Processor” within Photoshop. Choose the folder containing the exported PSD files as the source. Specify the desired JPG quality (e.g., quality level 12 for maximum quality) and click “Run.” Photoshop will process each PSD file, converting them into JPG format.

Conclusion
By following these steps, you’ve successfully mastered the art of creating customized certificates, visiting card , personal greetings or any other design with variable names using Photoshop’s powerful features. This streamlined approach not only saves time but also ensures consistency and professionalism across your designs. Whether you’re acknowledging academic achievements, recognizing employees, or commemorating special events, this method empowers you to effortlessly generate personalized certificates tailored to each recipient. Experiment with different designs and datasets to create a wide range of designs that reflect the unique accomplishments of individuals.
Interested in learning about variables in Illustrator ? – Ready to Maximize Your Design Potential? : Illustrator’s Variable Helps You to Automate 100s of Unique Designs
